
Eric is a Data Scientist with background in Computer science, Mathematics, and Statistics. Specialize in Data Mining, Machine Learning...
Create a Website for Free in Less Than 7 Minutes
Create a Website for Free
ATTENTION: Anyone Who Thinks It’s Too Hard, Too Confusing, Or Too Expensive To Create a website or Blog. Learn to create a website for free in Less than 7 minutes. Discover the Simplest Method for Creating a website and managing it yourself, even If You’re Not a “Tech Survey”.Yes, we will discuss and dig deep on how to set up and create your website in less than 7 minutes. This might seem daunting in reality, but it is more than possible. Regardless of your educational background and history, you can become a Bonafide web developer without ever knowing how to code or so ever.
Did you ask how? Then relax, grab yourself a snack. Because by the end of this content, you will get a full understanding of all the techniques and requirements you need to set up and manage your business website. And even go ahead as to create websites for others as a freelancer if you choose to.
How to Create and Set Up a Website
First and foremost, to Create and Set Up a Website, we have to uncover what makes a website? What a Domain name is, and how to obtain one. Also, a Web Hosting Service and how to install WordPress, Plugins, Themes, and even set up a business email address.
We will walk through every single step including, how to design your website without any technical support or needless to have a background in learning any HTML, CSS, JavaScript, PHP, or any coding whatsoever. Before we delve into creating our website, I would like to broaden our understanding of the basics and in-depth of what you need to know to build and maintain a website. And eventually, emerge from the beginner level to a Pro.
What You Need to Build a website
To build a website, there are two main things you will need to get started with, and these are the Hosting Service and a Domain name. So, what are Hosting and Domain names?
A Web Hosting
A Web Hosting is a virtual housing server that stores the contents of files on a website and has the technology to make the website accessible on the internet. For example, it can be compared to your mobile service provider being AT&T or Verizon. More easily, it is like buying a piece of land.
A Domain Name
A Domain Name, on the other hand, is the web address or website name where one can access a specific website. This is commonly termed URL, a Uniform Resource Locator specifying the location and a mechanism for retrieving information resources stored on a website or the world-wide-web. A compared example is the mobile number you got from your service provider. Or, building a new home on the piece of land you purchased.
Contents Management System (A Website Builder)
CMS for short; is a non-technical method of creating and managing a website without having the educational background of any Web development programs like JavaScript, MySQL, CSS, PHP, HTML coding, and many others. However, in this guide, we will be using a content management system called WordPress to build our website. I am briefly going to explain and compare to the other website builders and why we will be using WordPress over other website builders instead.
I must confess, there are about a million website-building platforms and service technologies. With top 417,526 attracting traffic according to the Built-with analysis tool trends. To name a few, we have Weebly, Wix, Squarespace, Joomla, Drupal, WordPress etcetera. There is no doubt by far at the time of writing the most popularly used, free, and easy to understand website builder or Content Managing System other than WordPress.
A Statistical Infographic of Website Building Platform Technologies
[/vc_column_text][vc_round_chart type=”doughnut” style=”modern” stroke_width=”1″ stroke_color=”black” values=”%5B%7B%22title%22%3A%22WordPress%20%22%2C%22value%22%3A%2236%25%22%2C%22color%22%3A%22blue%22%7D%2C%7B%22title%22%3A%22Drupal%22%2C%22value%22%3A%223.45%25%22%2C%22color%22%3A%22pink%22%7D%2C%7B%22title%22%3A%22Plesk%22%2C%22value%22%3A%222.7%25%22%2C%22color%22%3A%22peacoc%22%2C%22custom_color%22%3A%22%235aa1e3%22%7D%2C%7B%22title%22%3A%22Google%20Search%20Appliance%22%2C%22value%22%3A%222.63%25%22%2C%22color%22%3A%22sandy-brown%22%2C%22custom_color%22%3A%22%23cec2ab%22%7D%2C%7B%22title%22%3A%22WP%20Engine%22%2C%22value%22%3A%222.43%25%22%2C%22color%22%3A%22orange%22%2C%22custom_color%22%3A%22%23ebebeb%22%7D%2C%7B%22title%22%3A%22CPanel%22%2C%22value%22%3A%221.87%25%22%2C%22color%22%3A%22sky%22%2C%22custom_color%22%3A%22%238d6dc4%22%7D%2C%7B%22title%22%3A%22Joomla!%22%2C%22value%22%3A%221.79%25%22%2C%22color%22%3A%22violet%22%2C%22custom_color%22%3A%22%23b97ebb%22%7D%2C%7B%22title%22%3A%22Atlassian%20Cloud%22%2C%22value%22%3A%221.27%25%22%2C%22color%22%3A%22pink%22%2C%22custom_color%22%3A%22%23555555%22%7D%2C%7B%22title%22%3A%22%20Unbounce%5Ct%22%2C%22value%22%3A%221.14%25%22%2C%22color%22%3A%22mulled-wine%22%2C%22custom_color%22%3A%22%23f7be68%22%7D%2C%7B%22title%22%3A%22Moodle%5Ct%22%2C%22value%22%3A%220.99%25%22%2C%22color%22%3A%22sandy-brown%22%2C%22custom_color%22%3A%22%23555555%22%7D%2C%7B%22title%22%3A%22Squarespace%22%2C%22value%22%3A%220.93%25%22%2C%22color%22%3A%22vista-blue%22%2C%22custom_color%22%3A%22%2350485b%22%7D%2C%7B%22title%22%3A%22Bitrix%5Ct%22%2C%22value%22%3A%220.84%25%22%2C%22color%22%3A%22juicy-pink%22%2C%22custom_color%22%3A%22%23f7be68%22%7D%2C%7B%22title%22%3A%22Yii%20Framework%22%2C%22value%22%3A%220.8%25%22%2C%22color%22%3A%22purple%22%2C%22custom_color%22%3A%22%23f7be68%22%7D%2C%7B%22title%22%3A%221C-Bitrix%5Ct%22%2C%22value%22%3A%220.78%25%22%2C%22color%22%3A%22grey%22%2C%22custom_color%22%3A%22%235aa1e3%22%7D%2C%7B%22title%22%3A%22%20TYPO3%22%2C%22value%22%3A%220.75%25%22%2C%22color%22%3A%22violet%22%2C%22custom_color%22%3A%22%2358b9da%22%7D%2C%7B%22title%22%3A%22Blogger%22%2C%22value%22%3A%220.67%25%22%2C%22color%22%3A%22green%22%2C%22custom_color%22%3A%22%23ff9900%22%7D%2C%7B%22title%22%3A%22HubSpot%20COS%22%2C%22value%22%3A%220.65%25%22%2C%22color%22%3A%22sandy-brown%22%2C%22custom_color%22%3A%22%23f7be68%22%7D%2C%7B%22title%22%3A%22%20Netlify%22%2C%22value%22%3A%220.63%25%22%2C%22color%22%3A%22pink%22%2C%22custom_color%22%3A%22%23f7be68%22%7D%2C%7B%22title%22%3A%22BuddyPress%22%2C%22value%22%3A%220.56%25%22%2C%22color%22%3A%22turquoise%22%2C%22custom_color%22%3A%22%23f7be68%22%7D%2C%7B%22title%22%3A%22Webflow%22%2C%22value%22%3A%220.55%25%22%2C%22color%22%3A%22sky%22%2C%22custom_color%22%3A%22%23555555%22%7D%2C%7B%22title%22%3A%22Progress%20Sitefinity%22%2C%22value%22%3A%220.5%25%22%2C%22color%22%3A%22green%22%2C%22custom_color%22%3A%22%23ff9900%22%7D%2C%7B%22title%22%3A%22Wix%22%2C%22value%22%3A%220.48%25%22%2C%22color%22%3A%22turquoise%22%2C%22custom_color%22%3A%22%23ebebeb%22%7D%2C%7B%22title%22%3A%22Adobe%20Experience%20Manager%22%2C%22value%22%3A%220.46%25%22%2C%22color%22%3A%22chino%22%2C%22custom_color%22%3A%22%23f7be68%22%7D%2C%7B%22title%22%3A%22Siteimprove%22%2C%22value%22%3A%220.46%25%22%2C%22color%22%3A%22sandy-brown%22%2C%22custom_color%22%3A%22%236ab165%22%7D%2C%7B%22title%22%3A%22StatusPage%20IO%22%2C%22value%22%3A%220.45%25%22%2C%22color%22%3A%22purple%22%2C%22custom_color%22%3A%22%2300c1cf%22%7D%2C%7B%22title%22%3A%22K2%22%2C%22value%22%3A%220.41%25%22%2C%22color%22%3A%22chino%22%2C%22custom_color%22%3A%22%2358b9da%22%7D%2C%7B%22title%22%3A%22MediaWiki%22%2C%22value%22%3A%220.41%25%22%2C%22color%22%3A%22juicy-pink%22%2C%22custom_color%22%3A%22%235472d2%22%7D%2C%7B%22title%22%3A%22%20Intercom%20Help%22%2C%22value%22%3A%220.4%25%22%2C%22color%22%3A%22violet%22%2C%22custom_color%22%3A%22%23ff9900%22%7D%2C%7B%22title%22%3A%22Nextcloud%22%2C%22value%22%3A%220.38%25%22%2C%22color%22%3A%22violet%22%2C%22custom_color%22%3A%22%236ab165%22%7D%2C%7B%22title%22%3A%22Microsoft%20Word%22%2C%22value%22%3A%220.37%25%22%2C%22color%22%3A%22blue%22%2C%22custom_color%22%3A%22%23555555%22%7D%2C%7B%22title%22%3A%22%20Atlassian%20Confluence%22%2C%22value%22%3A%220.37%25%22%2C%22color%22%3A%22mulled-wine%22%2C%22custom_color%22%3A%22%236dab3c%22%7D%2C%7B%22title%22%3A%22Discuz!%22%2C%22value%22%3A%220.36%25%22%2C%22color%22%3A%22violet%22%2C%22custom_color%22%3A%22%2375d69c%22%7D%2C%7B%22title%22%3A%22JIRA%22%2C%22value%22%3A%220.35%25%22%2C%22color%22%3A%22blue%22%2C%22custom_color%22%3A%22%23ff675b%22%7D%2C%7B%22title%22%3A%22Million%20others%20%22%2C%22value%22%3A%2230.00%25%22%2C%22color%22%3A%22black%22%2C%22custom_color%22%3A%22%23f79468%22%7D%5D” animation=”easeOutElastic” css_animation=”none” title=”Top In CMS Usage Distribution Top For Creating Websites” el_id=”Top In CMS Usage Distribution” el_class=”ntm” css=”.vc_custom_1657065961453{margin-top: 15px !important;margin-right: 25px !important;margin-bottom: 25px !important;margin-left: 25px !important;border-top-width: 10px !important;border-right-width: 5px !important;border-bottom-width: 5px !important;border-left-width: 5px !important;padding-top: 5px !important;padding-right: 5px !important;padding-bottom: 5px !important;padding-left: 5px !important;}”][vc_column_text el_class=”align-center” el_id=”Learn to create a website for free in Less than 7 minutes.”]WordPress Usage Statistics
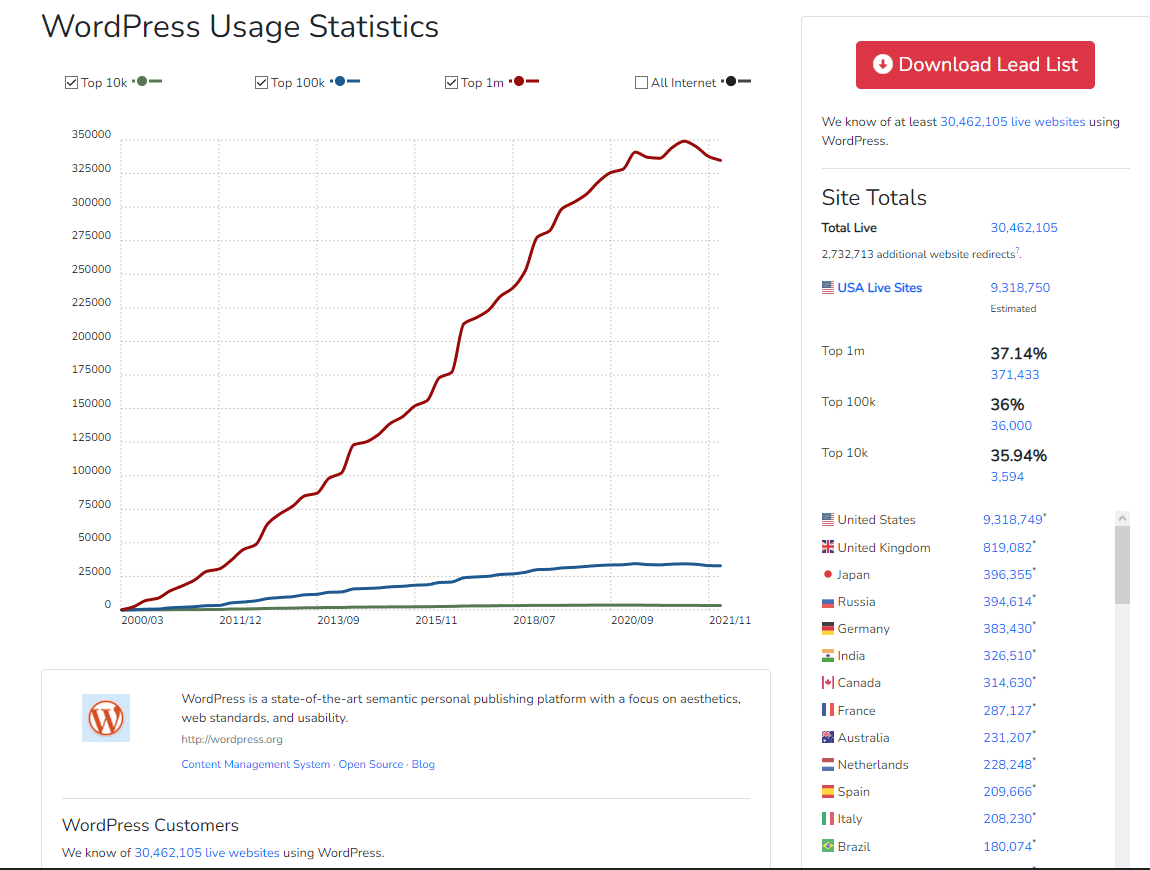
@Trends.builtwith
Why Use WordPress? The benefits for You…
As revealed from our statistics above, we can verify that almost one-third of the websites on the internet use WordPress, let alone the experience and age of the company. But importantly,
- WordPress is extremely handful and can run all types of websites other than the website builders that are good for only light blogging, e-commerce, and Small or simple informational websites.
- Joomla and Drupal compared to WordPress: WordPress is simpler and much user-friendlier. Whereas, Joomla and Drupal require you to have a bit of coding background.
- Other Website Builders are good for one-page websites and are quite expensive than WordPress.
- No coding background is required in WordPress especially if you want to create a website within a minute or a day, learning to code can take 6 months up to 1 year for HTML, let alone CSS, PHP, MYSQL, etc.
- WordPress is the most popular and commonly used content management system from small blogs, eCommerce, News sites to the biggest websites on the internet.
- WordPress is responsive and mobile-friendly with a massive number of people browsing from their phone and tablet, your website must work seamlessly across all devices.
15 Factors to Consider Before You Join Any Host
Most importantly, before I started to blog, the first thing was to research thoroughly the best hosting provider and a unique domain name for my blog. After days of reading mostly quality educational content on the internet, I came to notice there need to be some important aspects to consider before joining any hosting provider. There is a need to make certain the hosting service you take into account has unbeatable;
-
Customer Service and Reviews.
-
Live chat and telephone support.
-
The Server Reliability and Uptime Scores are to the mark.
-
The bandwidth and server disk space.
-
The number of domains you can add on.
-
Subscription period and Hosting plans can be upgraded or downgraded easily.
-
The signup prices vs renewal prices are moderate.
-
A refund policy and a free trial period are guaranteed.
-
Has essential hosting and e-commerce features.
-
Secure Security, all websites hosted at Bluehost are given a free SSL certificate. -
Pricing and User-Friendliness.
-
Personal business Email Hosting Options like: [email protected]
-
Server Responsiveness and Availability of Site Backups.
-
The Maintenance Costs and Account Limitations.
-
Also, importantly, the Hosting supports a Control panel that is easy to manage. These are the Web-based interfaces permitting you to manage numerous server configurations and services from the comfort of any Web browser.
so, what is Control Panel In WordPress?
A Control panel is a technology that allows you to install applications like the content management systems that help you to create and maintain your website, upload your internet documents also called Web files, set up your usernames, emails, install and set passwords for diverse functions such as database access and FTP.
3 Types of Hosting
Furthermore, know your website needs: As there are different Hosting types you might need to consider based on the type of website you want to build.
- A shared hosting platform is good for personal blogs, for its namesake, it’s a shared server for many websites and can be compared to apartment living.
- VPS (virtual private server) / Cloud servers are virtual servers that are quite similar to the share but have a limit to the number of websites hosted on it, not exceedingly more than 20 websites, and good for growing businesses like a large e-commerce stock.
- The Dedicated server which you host only one website on the server, is for the big leagues.
With the pieces falling into place, I notice there was one Web host out of the many that provided the above mentions. Not only was it on top of the chart, but it’s also number one recommended officially by WordPress for website developers, this was Bluehost.
Bluehost
Bluehost is a leading web hosting solutions company. Founded Since 2003, Bluehost has continually innovated new ways to empower people to fully harness the web. Bluehost is just not about getting people online but also, creating a better and safer web for everyone in the process.
The Bluehost Project Blue Spark
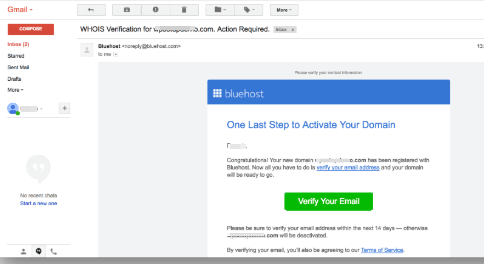
I recommend Bluehost too, not to mention their supportive project launched to assist newer website builders registered on Bluehost. The Project Blue Spark, now called Blue Sky, was launched with the intent to help newer website builders stack on what to do and how to go about launching their website. Before the Blue Sky project, below is the mail I received personally from Bluehost, an explanation of the Blue Spark Project. And how they can help ease the process of creating a website.
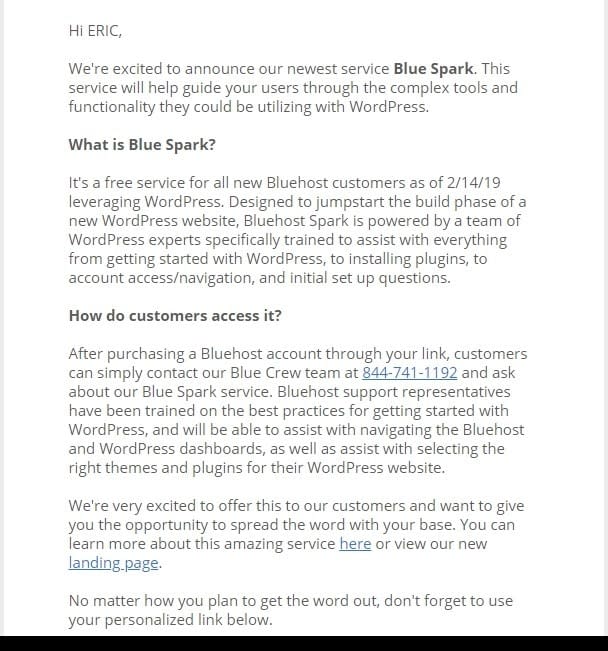
Blue Sky support offers industry-leading WordPress expert support. If you’re getting started with WordPress blue sky can help with the basics, such as selecting a theme, making simple edits, or setting up a contact form. If your WordPress site is up and running already, they can help you reach its full potential.

Now, Without much time taken, Let’s delve straight to creating our website now:
Step 1:
How to Register for Your Hosting and Domain Name
-
Choose Your Hosting Plan
To get your hosting and domain, head to Bluehost. Please feel free to use any web hosts you prefer, all the steps that we’re going to walk through are quite much the same. You will be taken to the official Landing Page or home screen of Bluehost.
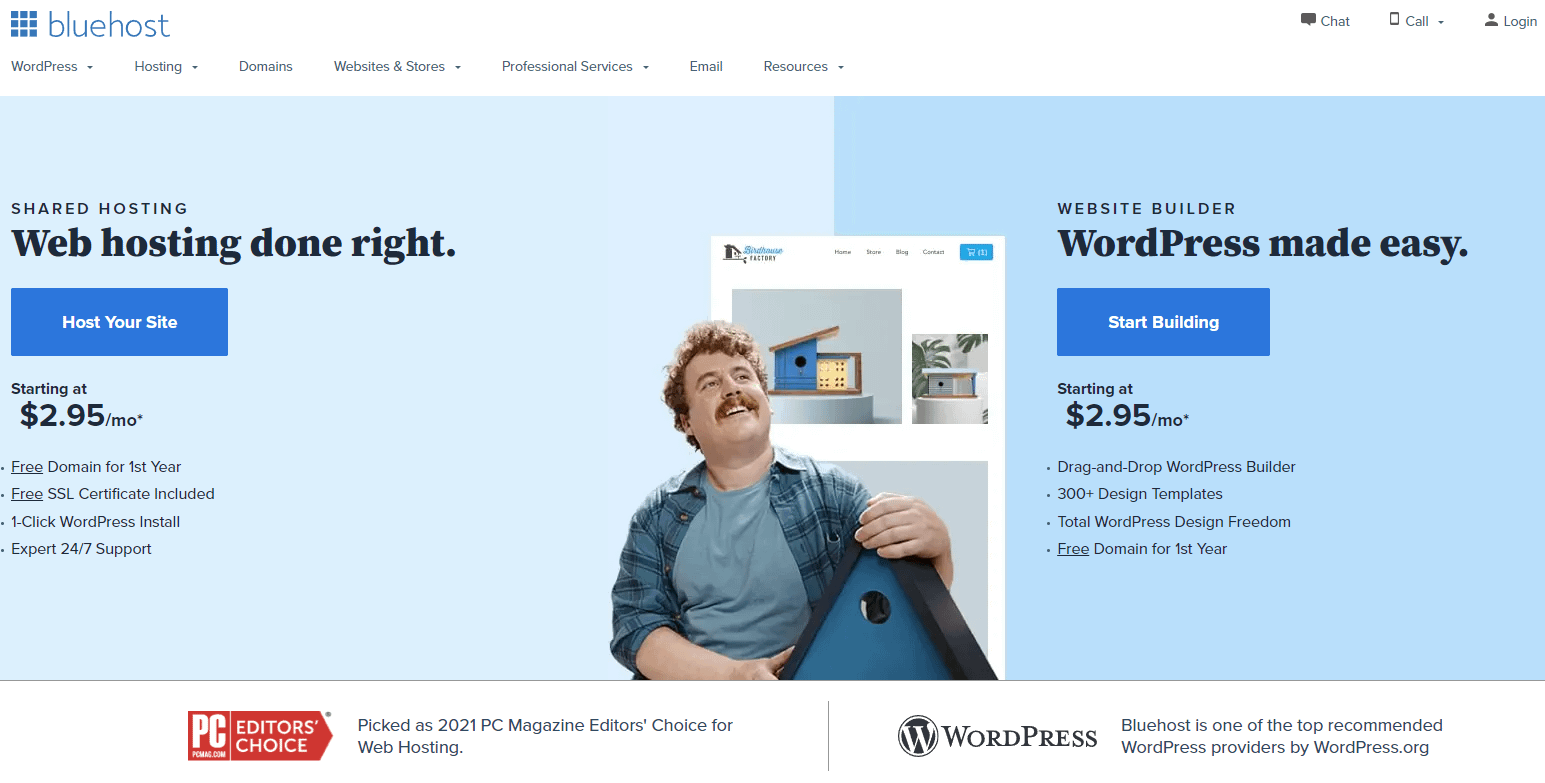
When clicked on the Getting started button, you will be taken to a page where you will be asked to select or choose a plan.
- The Basic
- Plus
- Choice Plus
- Pro
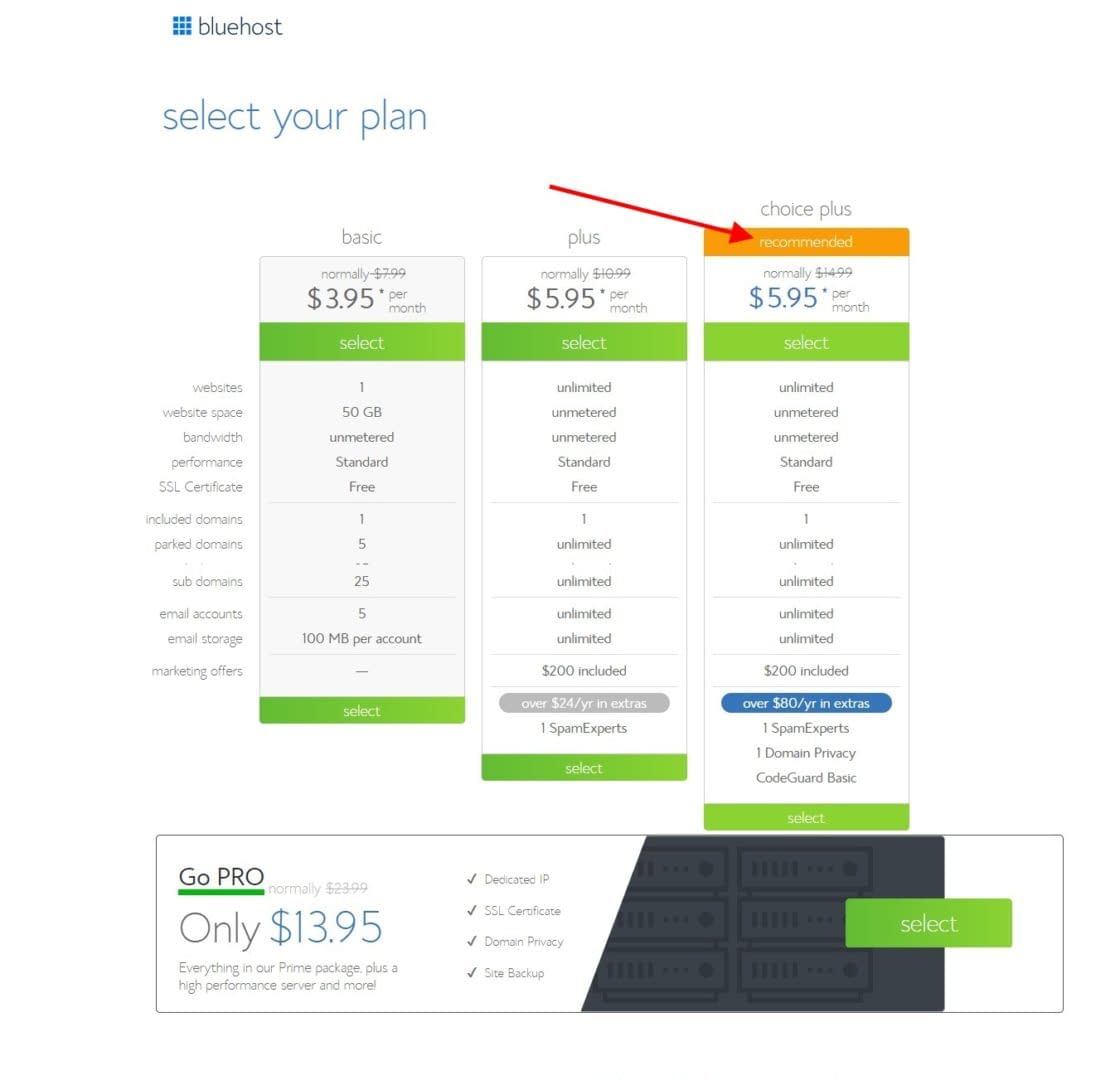
However, start-ups that need less functionality or are on budget can start with the basic plan. The choice plus also has the advantage of adding traffic to your site, and again, allowing you to host multiple websites on your plan.
In case you will be creating and managing websites for others or need more than one website. You can save money, in the long run, with the choice plus. Besides, you can downgrade or upgrade with any plan you start with for the first time. And all plans have inclusive with Bluehost…
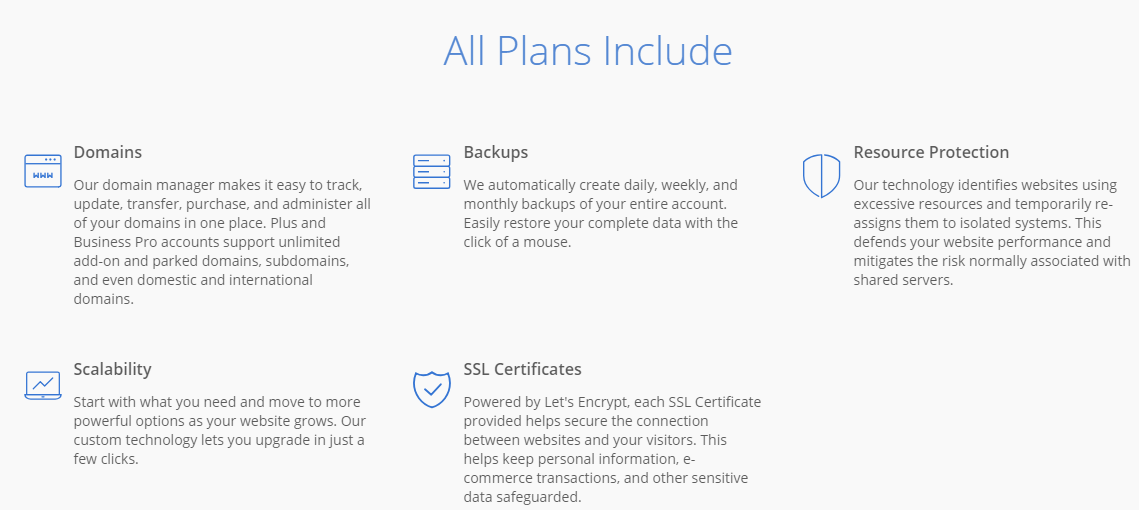
-
Choose Your Website or Domain Name
To get your hosting and domain, head to Bluehost. Please feel free to use any web hosts you prefer, Domain names can cost from $11-$500 per year if you already own a domain, you can sign up with your existing domain on Bluehost. Also, Bluehost gives a free domain for your first year despite the plan you choose.
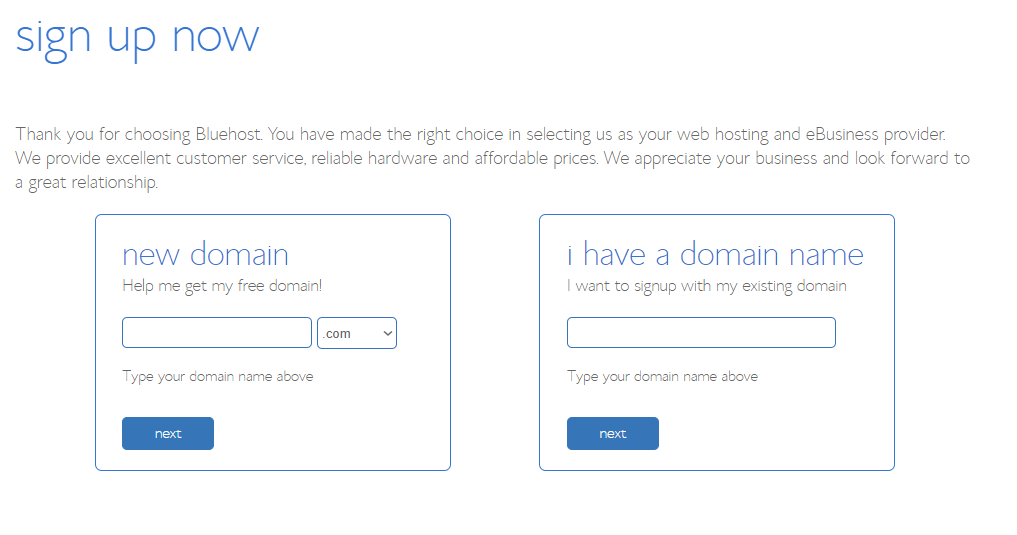
Honestly, I never thought domain names could be quite difficult to come by, most of the names that come to mind if not lucky enough will be already taken. Either way, you should choose a domain name that reflects your company or brand. Example: www.mybrandname.com. If you are creating a website for yourself, you can use your name too. I choose to use my name (www.amoheric.com) as the domain for this blog.
Top-Level Domain (TLD)
One thing you should be mindful of is the domain extension (TLD), this is the ending of the domain. The most commonly used is the (dot)com, (dot)net, (dot)Co, and (dot)org, whereas, (dot)shop,(dot)pizza, etcetera are emerging too. I recommend you go with what most people are familiar with and don’t need to remember your domain ending, thus the (dot)com when you want to create a website.
If your brandname.com is already taken, you can choose “.org” or the “.NET” which are also good, especially for charity organizations. In the process, you can skip this part on Bluehostif you can’t come up with the right domain name to choose from in the meantime.
Pro Tip:
You can check for the availability of a new domain name here:
-
Add Your Payment Information
To fully create your account, you must add your personal information like your first and last name, country, address, zip code, and the only optional field, your Business Name.

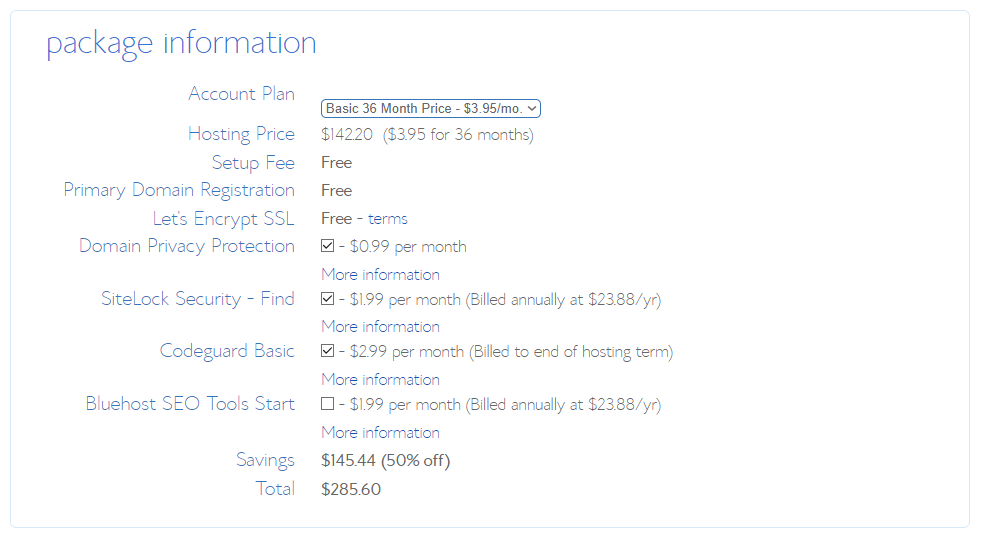
After you have filled in your personal information In a respectful order, you will have the opportunity to view your package information. You will also have the options to choose between months or years you want to keep your plan, the domain privacy protection, site-Lock security, Code-guard, and the Bluehost SEO tools.
Remember, the choice you mark or include will influence the plan price. If you choose the choice plus, you will already be on a bundle that includes the Code-guard and Domain privacy. I recommend you do not leave the domain privacy to uncheck, especially if you choose the Basic Plan and want to keep your ownership details like mobile number, address, and the email you used to register your domain privately on the who-is website. And Optionally, if you want to save yourself from unwanted emails and phone calls.
-
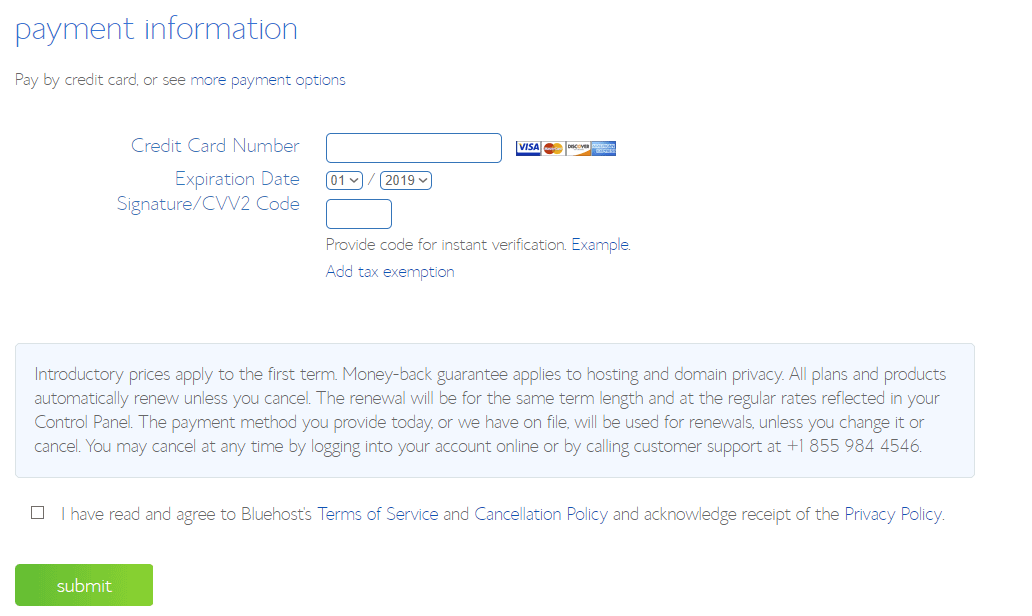
Finalizing Your Billing
Finalize your registration with your credit or debit card payment, there are more payment options like paying with your PayPal account too.
-
Welcome and Password Reset
Here, you will receive a welcome message indicating the success of your purchase after you have paid and accepted the terms of service and cancellation policy. A confirmation e-mail will be sent to your e-mail address on the Welcome page, you will see a call-to-action button that requires you to create a password. Please be mindful your password will be used for your account verification purposes.
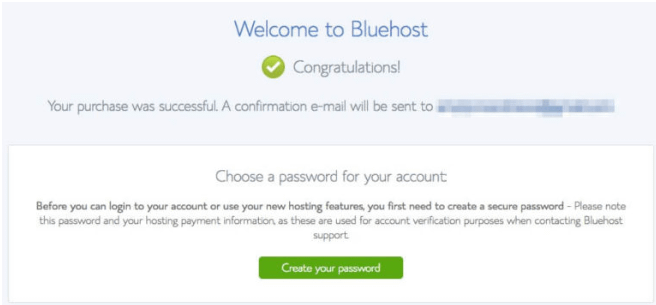
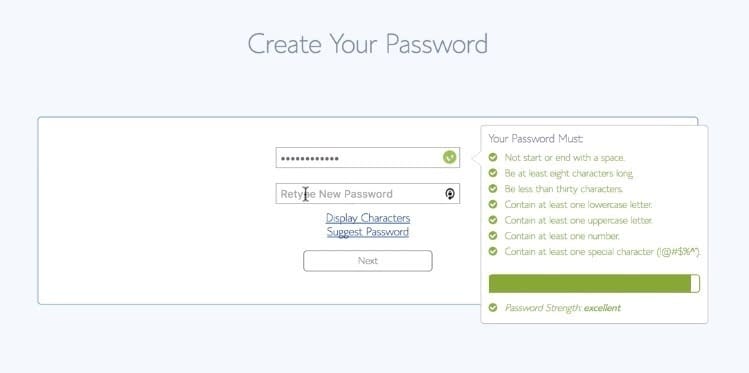
Create a strong and secure password, then click next
Step 2:
Install WordPress
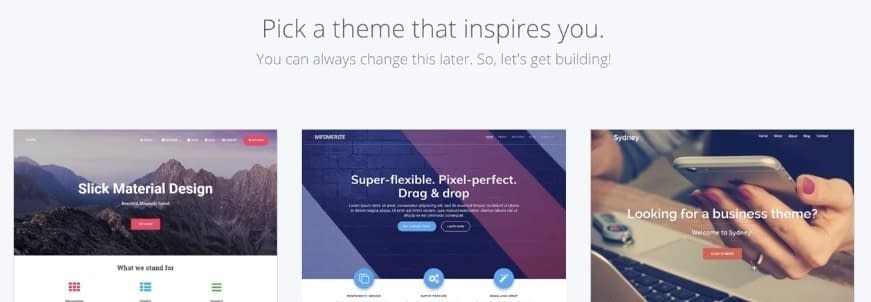
Yah! Congratulations for making it this far, you are all done and ready to set up your website now. Remember, Bluehost makes the installation of your WordPress much easier or I can say automatically when you have successfully created your new password. You will then be prompted to choose a theme for your website, I suggest you skip this step in the meanwhile.
Moreover, Bluehost will prompt you on the information they are provisioning your WordPress installation on a temporary domain and will update your site to the domain you choose automatically when it’s ready.
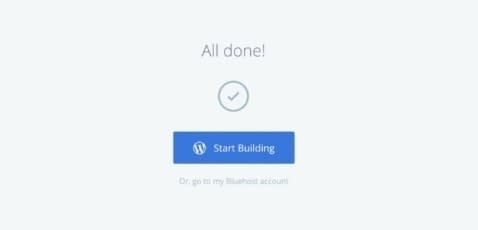
Click on the start building bottom, which will take you to the Back-end of your brand-new website. All done and set now.
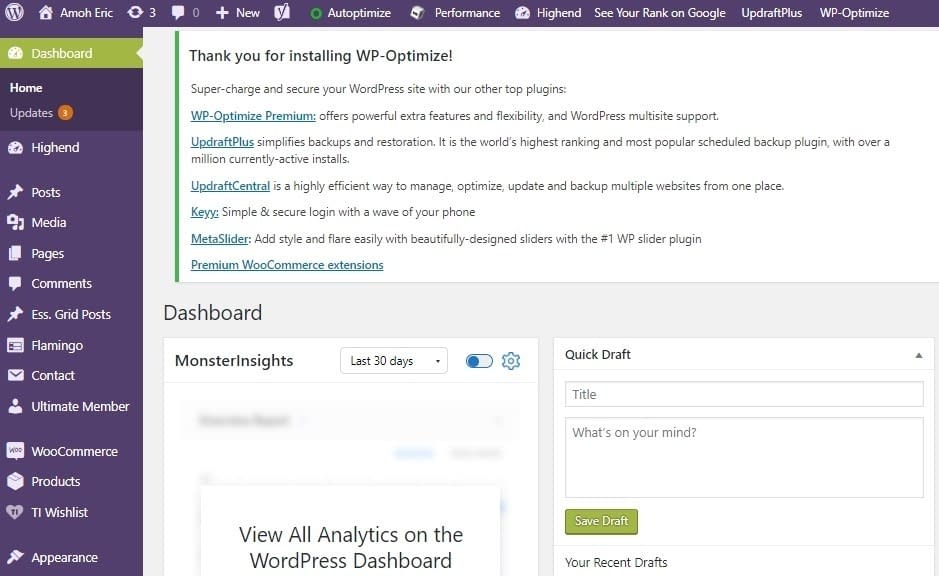
How To Install Other Website Builders?
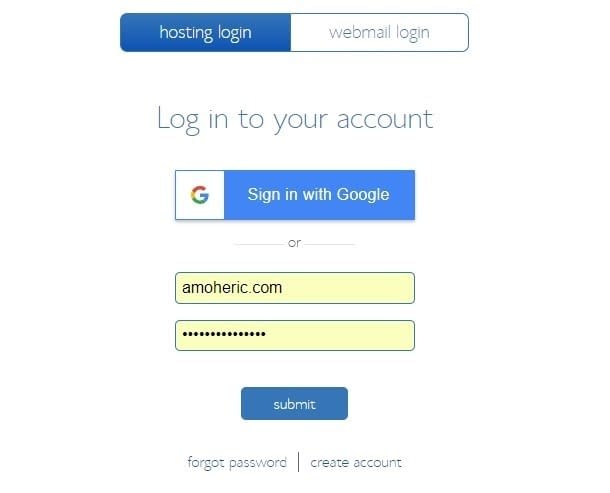
Likewise, Bluehost has the One-Click installation you can choose to install a different website Builder (CMS) you prefer, like Joomla, Drupal, Wix, etcetera other than WordPress. How? Log into your Bluehost control panel, enter your domain name and the password you set or you can sign in with your Google account too.
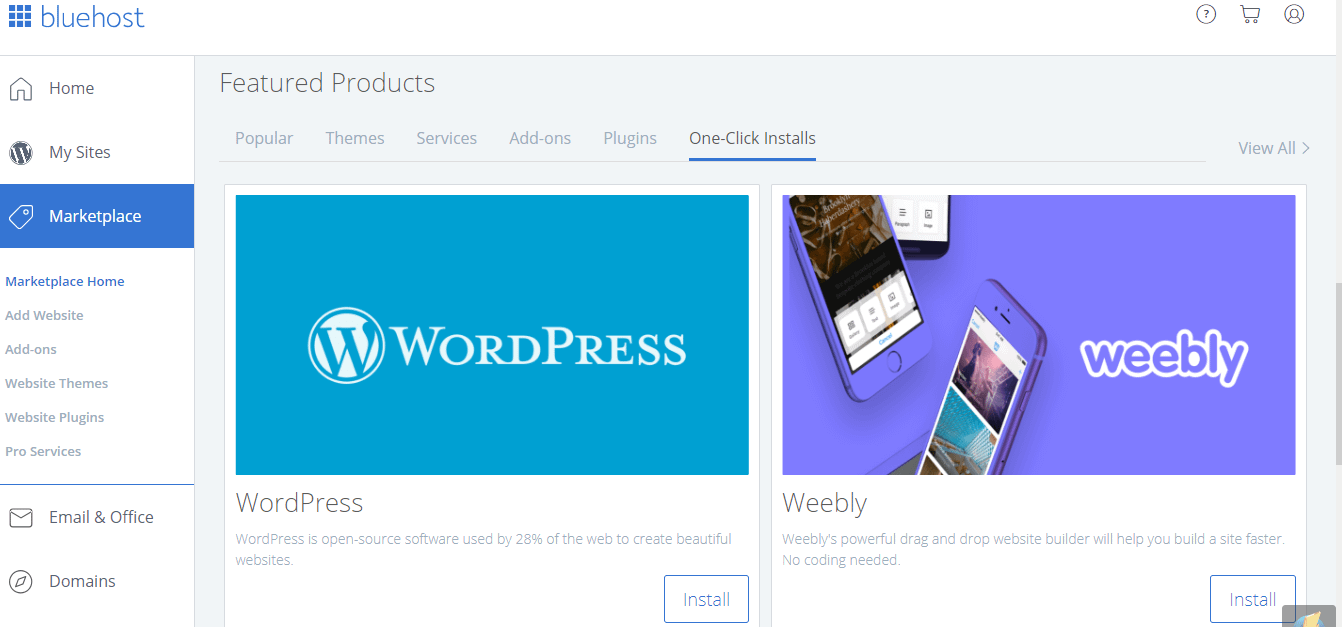
Head to the marketplace on your Bluehost control panel, you should find featured products that have options on themes, services, add-ons, plugins, and one-click installs, at this time of writing. Click on the One-Click Installs, you will find several content managing systems or website builder software you prefer to build your website. Click the Install bottom once you find your choice.
Please note, many detailed explanations have been given referring to the Content Management Systems (CMS)
Step 3:
How to Verify WHO-IS (Behind that Domain)
Importantly, you shouldn’t forget to check your email to verify both your Bluehost account and your domain name.
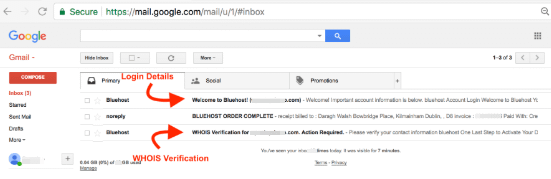
Please be sure to verify your email address within the next 14 days, to avoid your domain from being deactivated
Step 4:
Start Designing Your Website
-
Choose A Theme
What makes WordPress exciting to work with even when you are not a tech person is the easiness and flexibility to work on your website as a professional developer. WordPress allows you to choose from dozens of free themes to make your website look professional, depending on the type of website you wish to create, either a blog, e-commerce, a company, or a multi-purpose website.
To choose a theme, log on to the Back-End of your WordPress website. Click on Appearance with a painting brush icon under the appearance is the theme, customize, widgets, menus, and theme editor. Click on themes, you will find several free themes already installed for you.
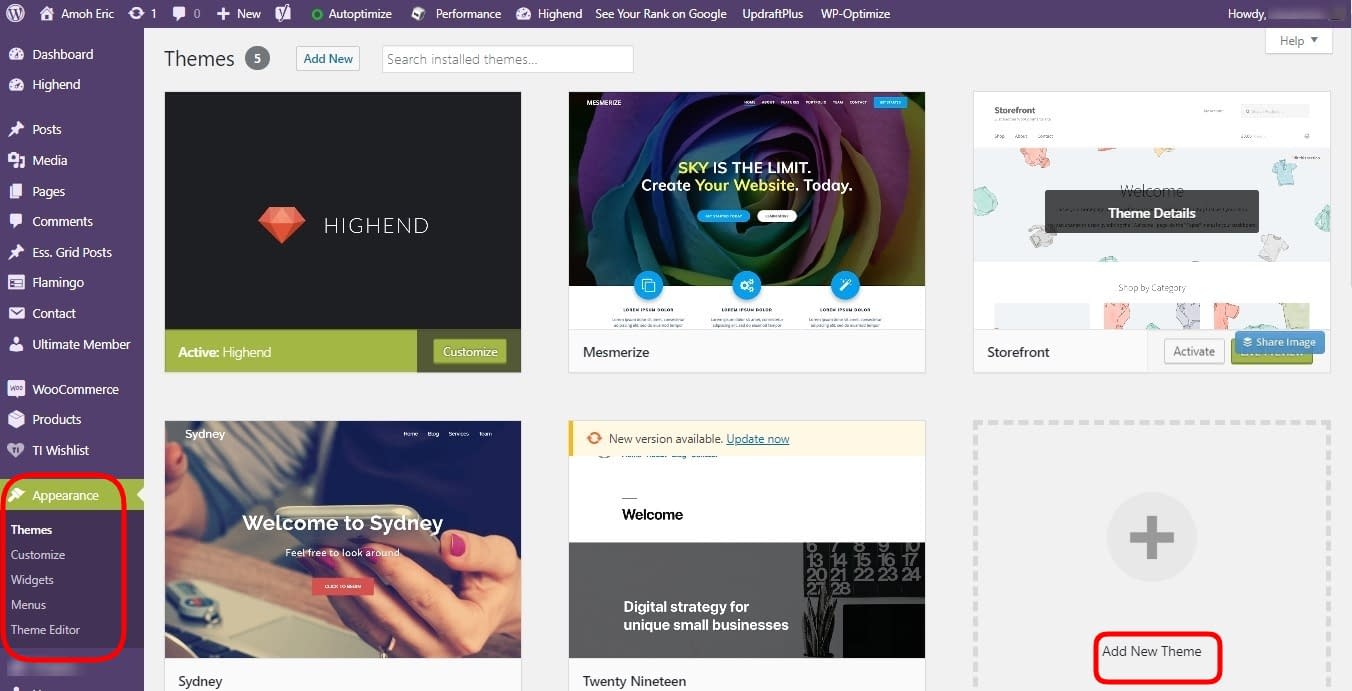
To explore more themes, click on the Add New Theme
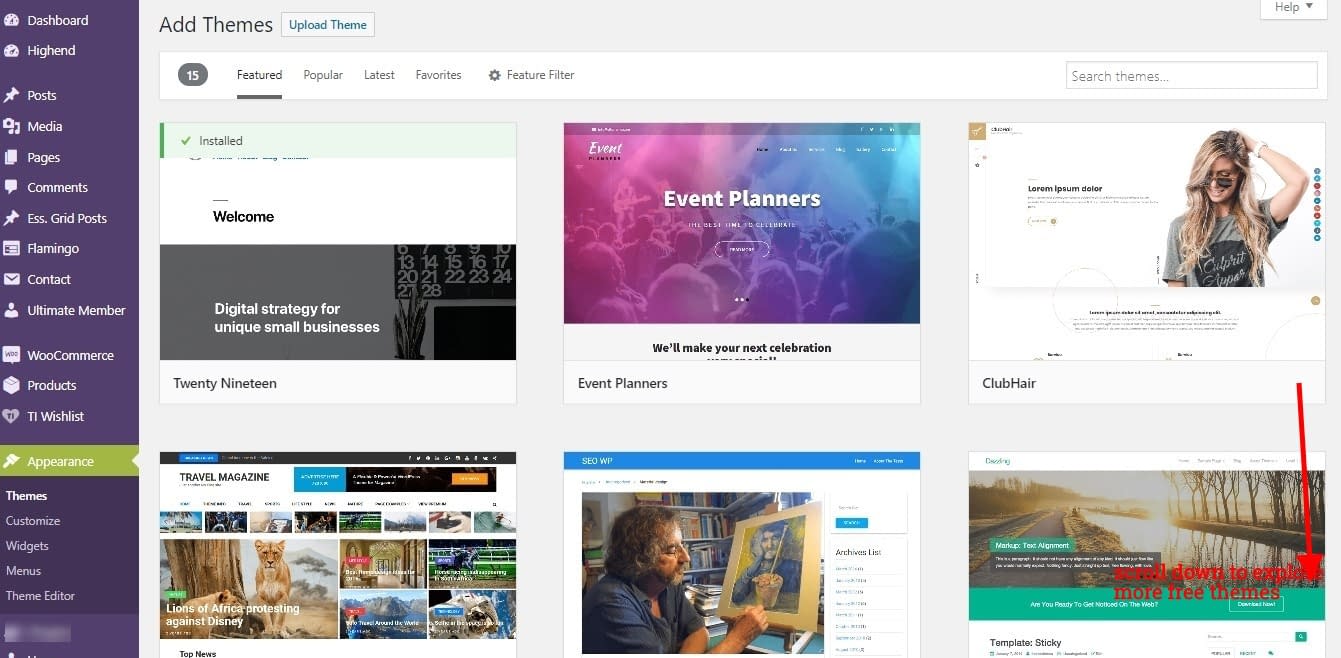
Premium Themes: And where to find them
You might not wish your website to look like everybody’s else and might prefer a more unique website, which also will make your website look more professional and taken seriously by your website visitors.
In that case, I suggest you head to the team forest or mojo market from your Bluehost control panel for several premium themes to choose from. Install a theme of your choice by clicking on install just below the theme, and the activate button after it has finished installing. Note, changing a theme won’t affect your previous post, content, or pages at any time.
How To Add Post, Pages, Menus, and Widgets
Every great website is identified by the quality structure layouts and its contents. The contents are supposed to be informational clarifying what your message or website is about to visitors. To structure your site means having the basic requirements every good website must-have, like the Pages, Post (contents), Menus, and Widgets (for easy navigation). You must create pages like your Contact, About Me, frequently asked questions (optional), Blog, Home, etc. And to make these Pages and Post easy to navigate, we create Menus.
To create your first post log into your WordPress dashboard, navigate to Posts > Add New to create your content. You can also edit or update an existing post from the All-Posts section. Under Posts, you can create your Categories and Tags too.
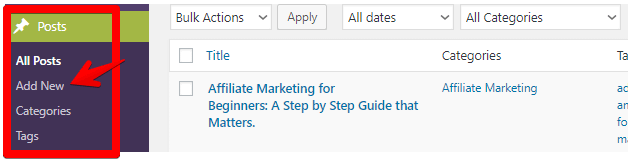
The same method is applied when you want to create pages, then hit publish afterward.

Now that we know how to create pages and posts we want, it’s time to make it visible on our homepage for easy user experience (UX) / navigation.
Creating a Menu on Your Website
On the contrary, how we can do this is to head down to Appearance on our WordPress dashboard, navigate to the menu and create a new menu. You can name it Main-menu, then start adding your created pages, post, etc. to your main menu, Click Manage > display location to set your main menu to the top menu, and save your customized menu.
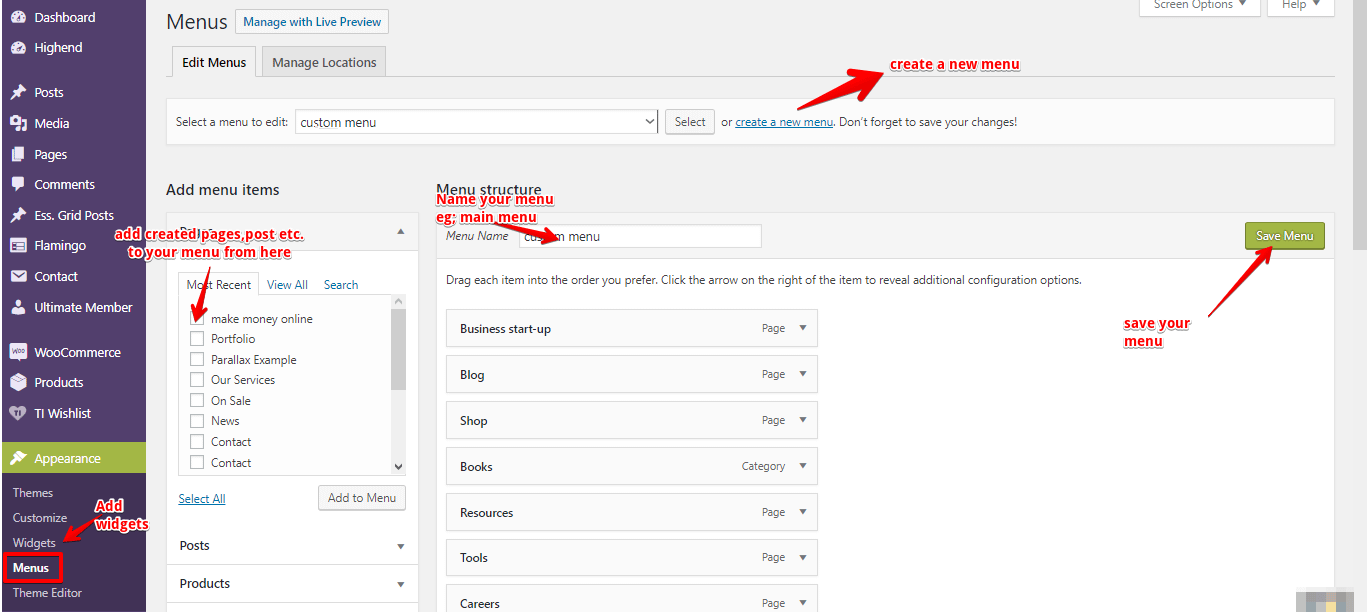
Further, to see your new menu on your homepage, refresh your homepage. Your new menu should be visible on your homepage now, you can simply adjust how your new menu appears by rearranging the order if you want to put some page or your blog first.

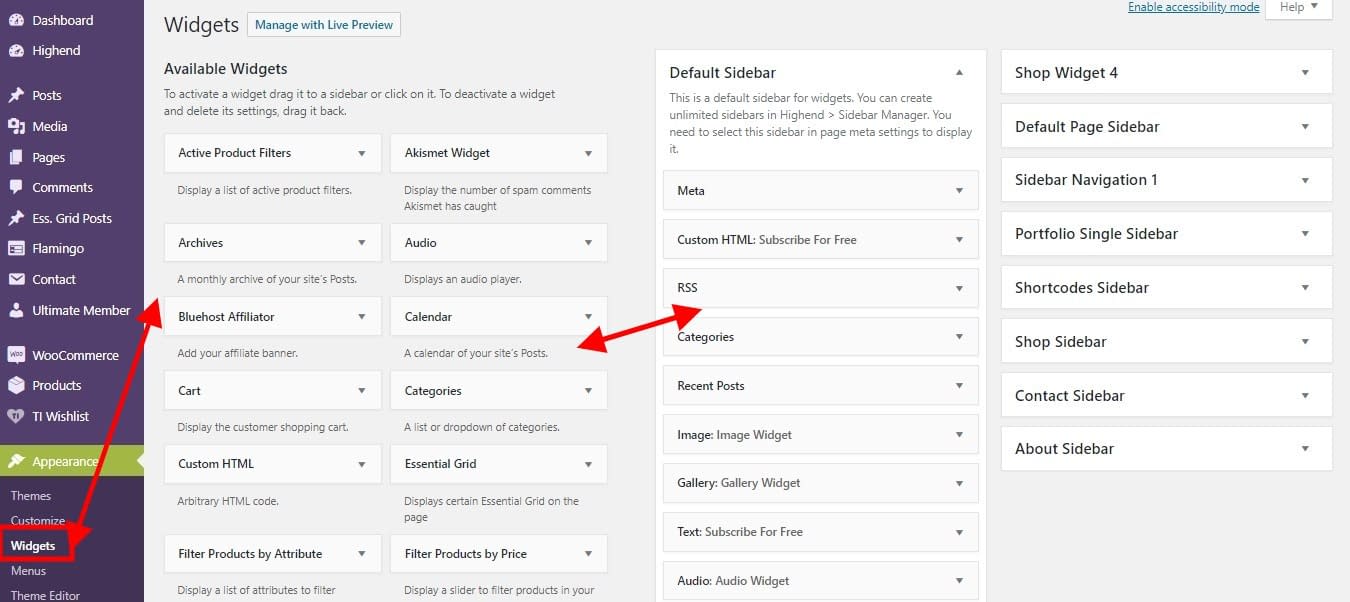
Setting Up a Sidebar Widget
Widgets are the sidebar notification of our website; you can drag and drop items you want to show at the side of your website. Like a recent blog post, categories, or even collect emails.
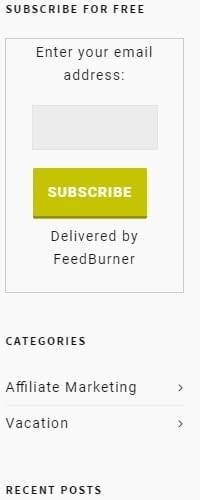
To add a widget to your sidebar, from your WordPress dashboard once again. Head to Appearance > Widgets, and from your available widgets just drag and drop what you want to appear on your sidebar to your default sidebar widgets. You can also delete a widget you don’t want from the drop-down of your selected default sidebar.
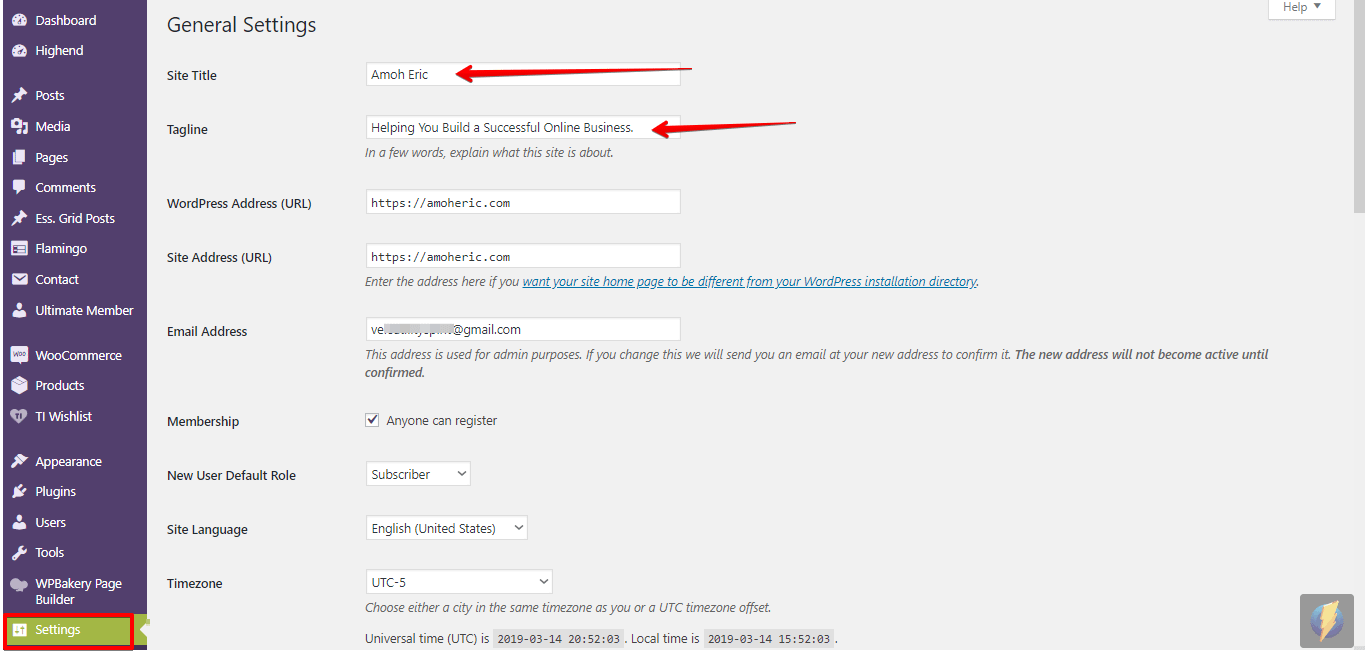
Tweaking your website settings
Every website has a title and a tagline to every specific page but in general, it should have the whole meaning of what your website is about for easy recognition by search engines and the understanding of your visitors.
Example: To see this page’s title and tagline, you can hover your mouse to the tab area, you will recognize a tag for this very topic.
Thus, if your website visitor lands on your homepage, or type your domain directly at the search console. This should provide the basic knowledge of what your website is all about, to set your general site title or tagline.
Navigate to Settings > General to set your brand name and tagline. Under the settings, is General where the site title and tagline are changed. Writing and reading where you can set your home page display to a static or recent post. And Discussion, where you can set your website to allow comments on your blog post or blacklist some bad words you don’t want on your site.
How to Install the Right and Security Plugins
What is a Plugin?
Plugins are software add-ons or advanced features added to a website to perform extra functionality that was not originally designed for the website. There are more than 5000 plugins on wordpress.org, but the quality of the plugin is more important than the number of plugins you can add to your site. Installing the right plugins can be helpful. You can read the facts you need to know about plugins here.
In addition, there are some important plugins you will need to install to add some functionality and even fully protect your website, especially from hackers. To add and install plugins on your site, log on to the back-end of your website. On your WordPress dashboard, navigate to Plugins and click on the Add New to get access to numerous plugins.
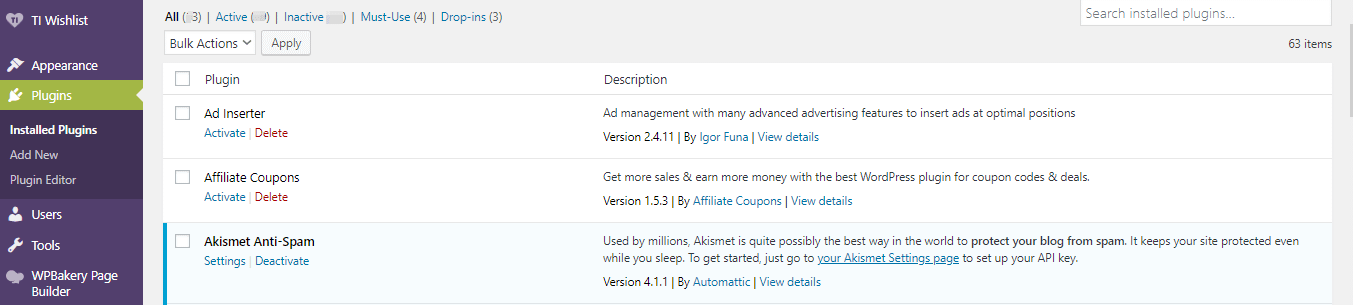
On the contrary, you should be mindful installing more plugins can slow your website speed. I recommend the following best plugins since you will need them;
- Word-Fence Security to protect and secure your website.
- Contact Form 7 to be easily contacted by your web visitors.
- Yoast SEO for WordPress to promote your website on Search Engines.
- Google Analytics to track the performance of your website.
- Woo-Commerce to Set-Up an online store for your website.
- Updraft-Plus Backup Plugin to Back-up your website.
- W3 Total Cache to speed up the website performance.
- And you might need a plugin that your visitors can share your post across the web.
To get to know the best plugins to choose from, please refer to this article.
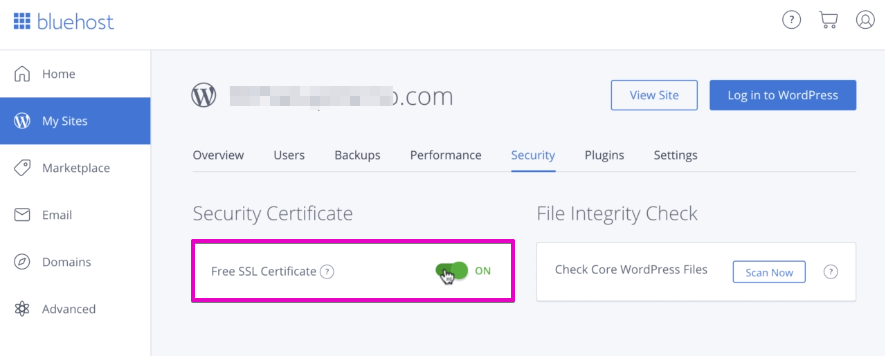
How To Activate Your Free SSL on Bluehost?
What is SSL?
Secure Sockets Layer is a cryptographic protocol software tool that protects the internet. Having an SSL certificate on your site increases conversion rate, customer trust, site security, search engine top-ranking, and more. Since every consumer wants full security, it is hard for someone to give their personal and credit card information on a website, especially with no SSL. You can learn more about SSL at Global-sign.

At this time, we want to activate our free SSL from Bluehost. So, we log into our Bluehost Control Panel > My Sites then > Manage site. Head to security and activate your free SSL Certificate on the left.
How to Set up your E-mail Address That Uses Your Domain?
In this section, you will learn how to set up a business e-mail address. From your Bluehost Control Panel after you’ve logged in, navigate to Email & Office > Manage.
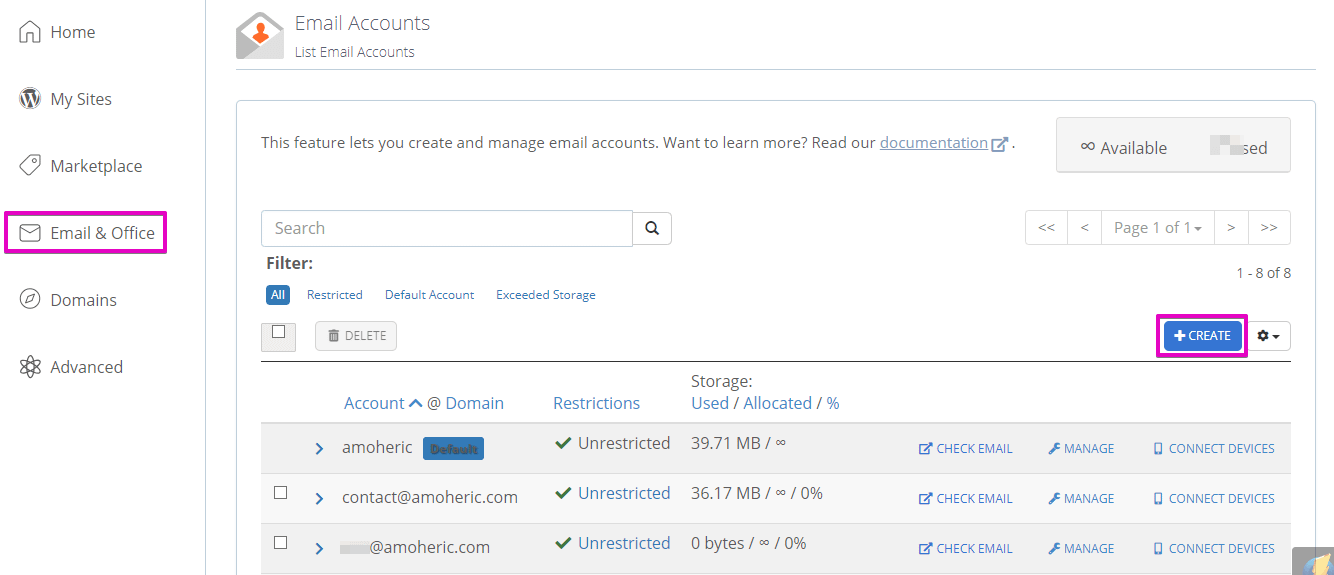
Click on the create a new or the plus button to create an email account, select the domain you want to create this email. Especially if you have more than one domain.
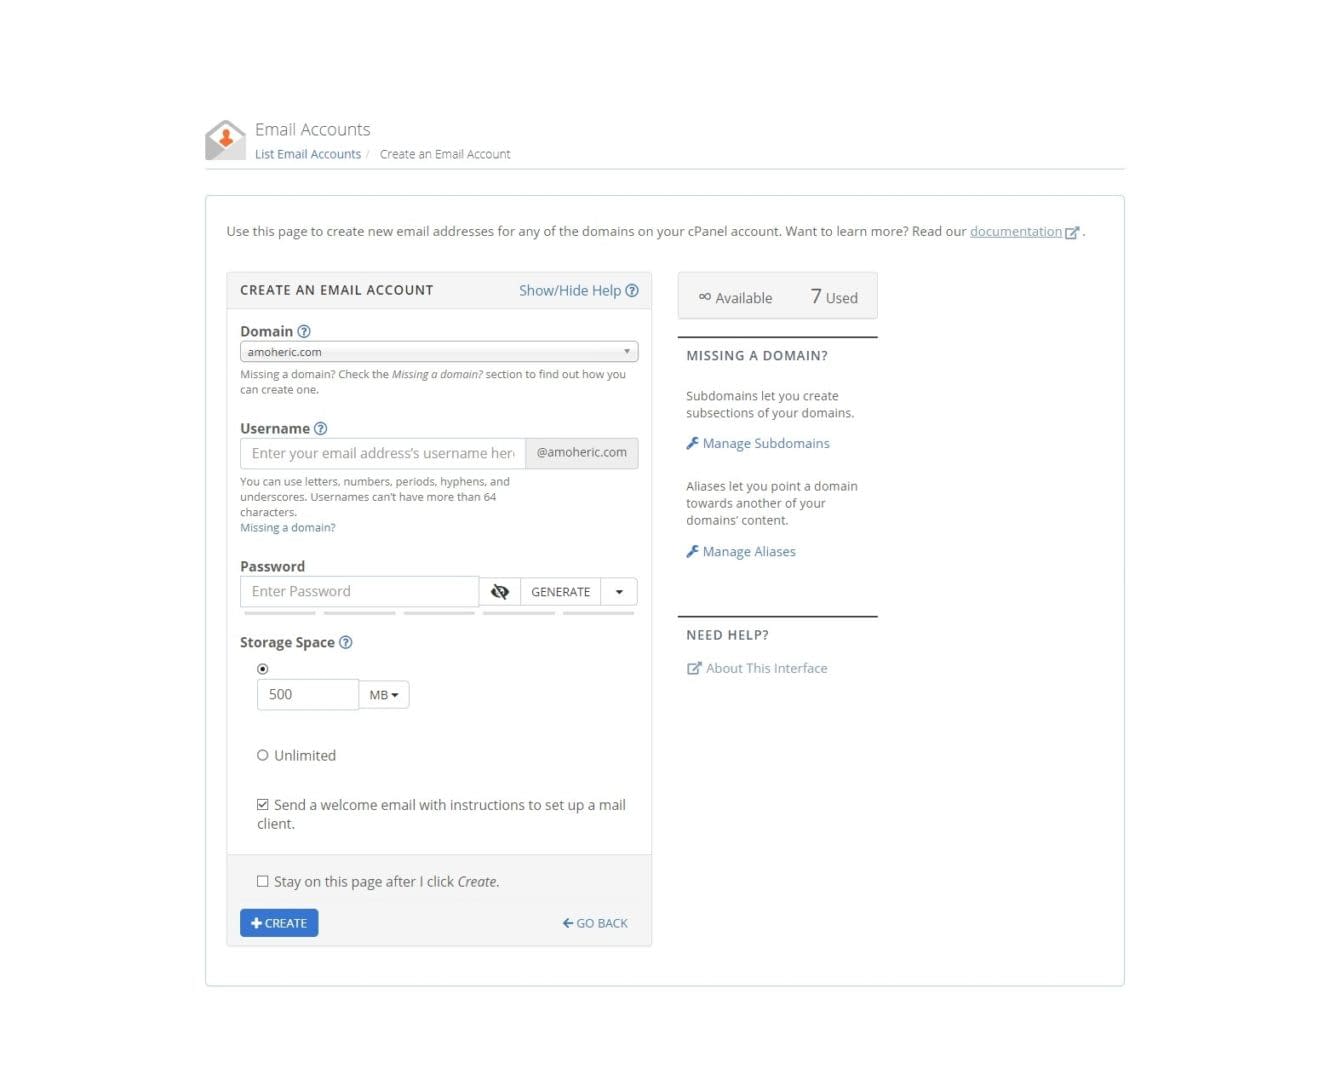
To continue, insert the user’s name you want to begin with your email. Example: Info, Contact, Mail, or even your name.
Just remember to make it look professional, then insert a strong password. You can optionally click generate on the right side of the password label to automatically get a strong password from Bluehost. Please, don’t forget to write it down so you don’t lose it.
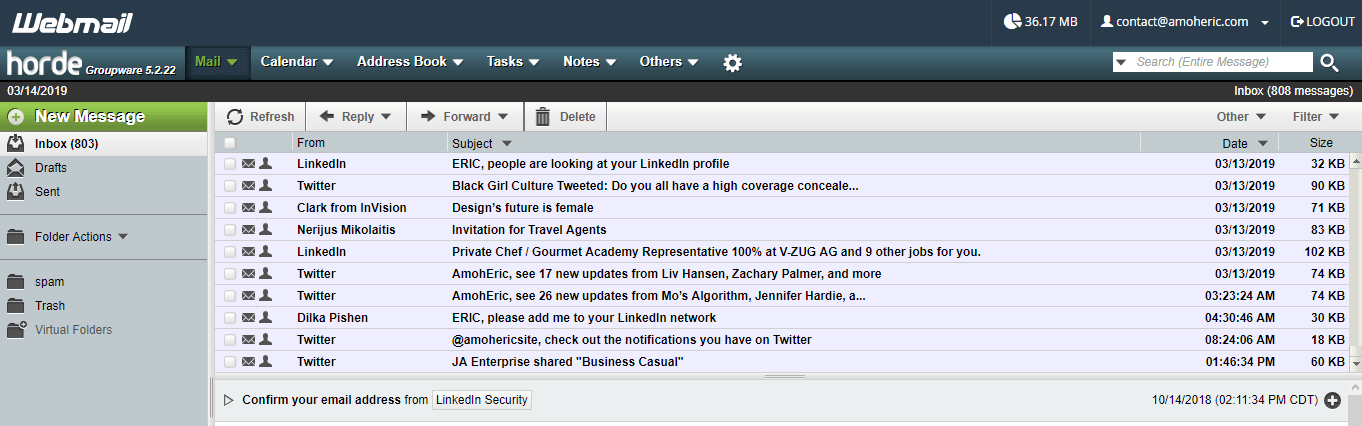
Then select the amount of space you want your email to have, and then hit on create. Which in turn will take you to choose a default Webmail Application, thus, either Horde, Round-cube, and Squirrel-Mail. All these webmail have the same functionality, though you can check the details of these three webmail to decide which to set as default.
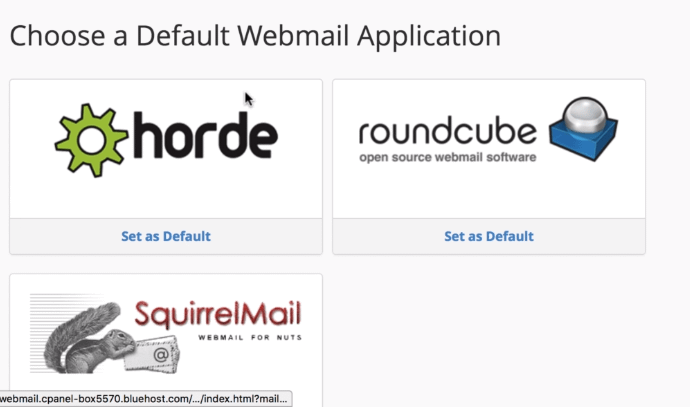
After you set one as your default webmail, you will be taken to a page where you can see all your emails.
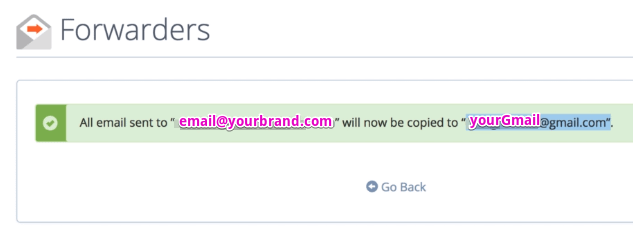
Create An Email Account Forwarder
Last but not least, to make life much simpler on your emails, you can create a forwarder that will send all your emails to your Google or any email address you access every day. From your control panel, Email & Office > navigate to Forwarder to create an email account forwarder.
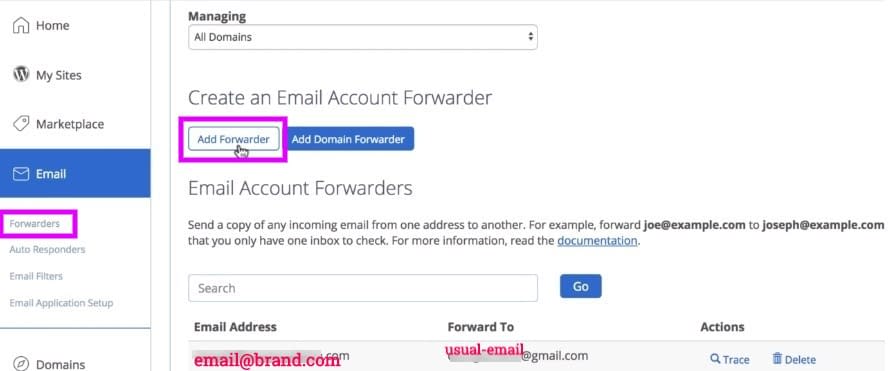
Click the Add Forwarder bottom, add the business email you created earlier. Example: [email protected] the domain, and add the destination email address where you want to forward all your business emails to. This can be your Gmail, Yahoo, iCloud, or the one you access every day.
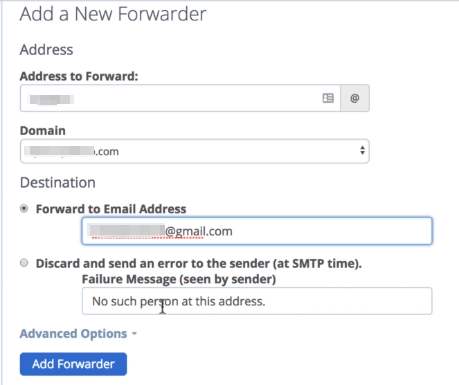
Click the Add Forwarder to finalize your domain email set-up
Inconcludtion on how to create a website:
You began reading this post looking to understand a way to create a website of your own. I believe it’s time to make the execution now. You’ve got the recommendations, gear, and processes to create a website. Don’t let your fears get in your way. If I could do it, then you can too.
Learning is the beginning of wealth. Searching and learning are where the miracle process all begins. The great breakthrough in your life comes when you realize that you can learn anything you need to learn to accomplish any goal that you set for yourself. This means there are no limits on what you can be, have, or do.
-Albert Einstein
This ends our website set-up lessons for today. Please feel free to share (let a friend know). And also, contact me for any queries or share your ideas in the comment box. Thank you.
[/vc_column_text][/vc_column][/vc_row]Original link: Amoheric.com
喜欢我的文章吗?
别忘了给点支持与赞赏,让我知道创作的路上有你陪伴。
发布评论…